Showing posts with label DIY. Show all posts

Wednesday, 23 November 2011

A very crafty Christmas

Christmas is fast approaching, and Christmas means presents. (Well, obviously it doesn't just mean presents, but its a big part of it). Luckily in both Matt and my family we are doing secret santa, so buying presents for one other adult each, as opposed to about 16 adults (phew!). Of course the kiddies get presents as well, but there are only two so far, so thats not too hard. Who doesn't love getting little girls presents??

This year I am doing a lot of crafty gifts. Crafty gifts are great because they are fun to make, they are made with love, you can put personal touches on them, and they are generally way  cheaper than bought gifts. I thought I would share some crafty ideas with you, so you can have a crafty christmas. Crafty gifts can also be in supplement to a bigger bought gift.
(Note to any family reading this: I am not sharing what I may or may not be making you, so don't worry, your gifts are still a surprise!.)

DIY coasters


Blackboard coasters, and I love the look of these lace coasters - so easy and pretty.

Epsom Salts

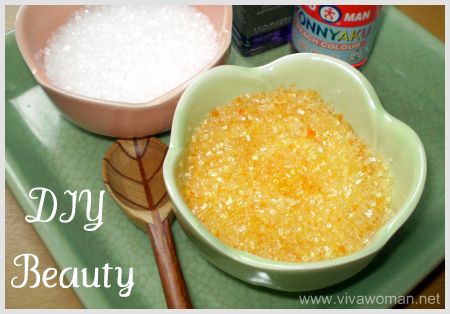
Perfect for the bath lover, and easy to make. I would present it in a nice jar.

Candles


I saw these candles in iko iko and knew I could make them myself (I haven't yet, but I will.) You can go thrifting looking for old open top jars or old (thick) wine glasses, and use them. Candle making can be dangerous, but it is doable. There are lots of tutorials, here is one.

Make your own Book


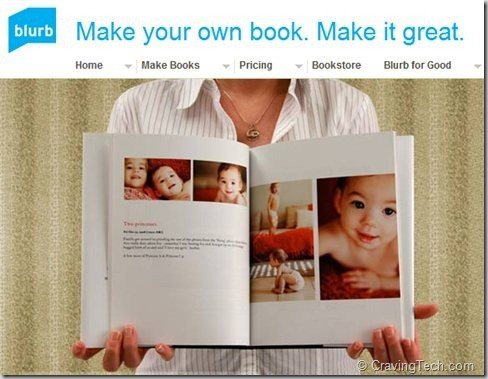
You can design your own photo book, recipe book, baby book, poetry book... the list goes on and on. You can design it online and get it sent to you. I recommend using Blurb, which is high quality, reasonable price and easy to use. I would get onto this soon as I don't know the time it takes to deliver. I am using blurb to do our wedding photo book, I haven't finished yet but I can't wait to see it! I know people who make a book a year with family photos etc, which I also think is a great idea.


Chilli Sauce


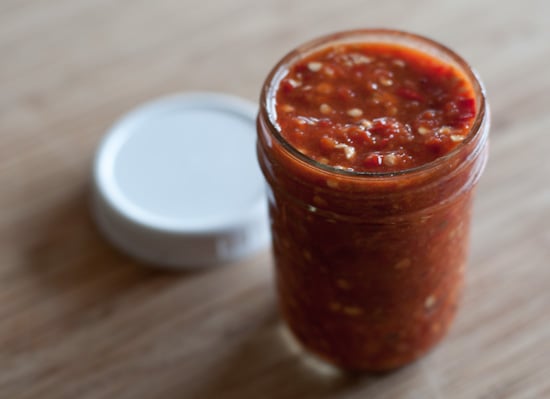
Who doesn't love Chilli sauce? This is something you could make in bulk and give to all the rellies. Add cute jars and you're done! Recipe here.
You could also make dukkah or marinated mushrooms.

Photo calendars

Photo calendars are great gift ideas for parents or other relatives. Or make one for yourself of your favourtie photos! At the moment Whitcoulls and Kikki-K have the diy-photo-calendars for about $20, and you can just print out your photos and stick them on. Easy!

So thats all for now. I hope you like my ideas! I am excited to share what I am making my family as well, but that will be after christmas :)


Friday, 21 October 2011

Hair Tutorial: How to get Ombre/Pastel Hair


Pastel hair colours are so in right now. Just see here, here and here. I was intrigued, and decided to give it a try myself. I watched a few how-to videos, and decided to try it myself.

First things first, you will need blonde or lightened hair to start with. It won't show up on darker hair. So if you want to DIY, you will have to bleach your hair first if it is not already light, and sorry I don't know how to do that.

Ok, so you will need the following;


  • Gloves
  • Hair Colour (I used Fudge Paint Box, off trade me, or from a hairdresser. That small bottle will last ages)
  • Lots of white conditioner. It can be the cheapest kind, as long as its white
  • A bowl to mix in
  • Clips to clip your hair up
  • Tinting brushes - this makes it way easier. Available at any pharmacy
  • A towel you don't mind destroying
  • Not in the photo, but tinfoil to do foils, to keep it out of the way while its drying
I would recommend doing this naked, with the towel around your shoulders. The colour will destroy any clothes you have on. 

Begin by mixing a tiny bit of the hair colour with heaps of conditioner. (I used too much colour, and ended up using all the conditioner, hence making way too much mixture.)


You could go this light, or lighter. It depends how pastel you want it to be. Now make sure you are wearing gloves and apply it to your hair. If you want 'highlights' you will need to use tinfoil to paint it onto, so you don't get the rest of your hair. If you're just doing the bottom, like me, you can use tinfoil or not, its up to you. You could do two different colours (I may try this), but you will need to be careful to keep them separate from each other


As you can see, the colour stains! I had to do this twice, as the first time it wasn't showing enough. The second time I did about 10 foils instead of 2, and it made it look a lot better. So do as I say, not as I show in the photo. 

Leave on for about 30 minutes - you can check the colour as you go. Rinse out with cold water. Then dry your hair and admire your colour. Style as usual

After first attempt- see not very bright


After second application - much better!


The good thing about doing just the tips, or hidden highlights, is that you can easily hide them for work, in an up do or a bun. The colour will wash out pretty quickly - mine is quite faded now. So just apply again when you need to, if you have a lot of mixture made up, all you have to do it apply it. 
To make it even better, you could do it with a friend, apply it to each other hair, for a more 'even' look. (Note, if doing the colouring with a friend, maybe best you don't do it naked. Might be time to find some old clothes you don't mind ruining ;)


Your hair will look so pretty! I think its a great look for summer

Enjoy xo
Related Posts Plugin for WordPress, Blogger...